
Download the current release of Joomla! 3.2
Move the downloaded Joomla! installation package to the server. Use a FTP Client to transfer the Joomla! 3.0 files to your server. If you don’t already have an FTP client, we recommend Filezilla
Hint - This can be accomplished by simply moving the downloaded package to your server, then unpacking it. Or you can unpack the files on your local computer, then move the Joomla installation over to your server. Either way, the Joomla installation needs to be unpacked in the root of your site.
Warning!
If you unpack the files on your own computer, then copy them to your server, be sure to move only the folders and files contained INSIDE the Joomla! package. If you unpack the folders and files into a folder, for example called, Joomla and then upload that folder, your site will have to be accessed at yoursitename.com/Joomla instead of yoursitename.com.

Database for Joomla! Installation
- If you need to create a database, please read "Create a database for use with Joomla!" first or skip to step #2.
- You will need to note basic database information needed when the actual Joomla! installation is started.
- Location of datase, localhost? Or a specific host's server such as dbserver1.yourhost.com
- The database name
- The database user's name
- The database user's password
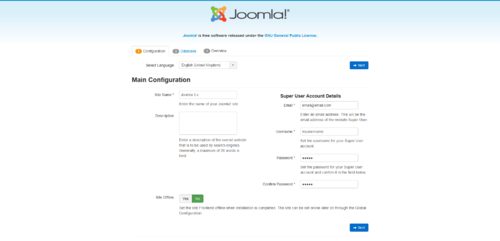
Main Configuration
With the above requirements met, a database created and the required Joomla! files in place, you are ready to install Joomla!. Start the Joomla! web installer by opening your favorite browser and browsing to the site's domain name. On host installation you will use http://www.yoursitename.com. If your are installing Joomla! locally, you will use http://localhost/<path to joomla files>, and you should see the installation screen.
J30 Installation screen page 1.png
Joomla! will try to identify the Select Language field automatically from your browser's language. You can change this if needed.
Fill in the following information.
J30 Installation screen page 1.png
Joomla! will try to identify the Select Language field automatically from your browser's language. You can change this if needed.
Fill in the following information.
- Site Name: The name of your website — this can be changed at any point later in the Site Global Configuration page.
- Description: Enter a description of the website. This is a the global fallback meta description used on every page which will be used by search engines. Generally, a maximum of 20 to 25 words is optimal. Again, this can be changed on the Site Global Configuration page at any time. For more on metadata, see Global Metadata Settings and Entering search engine meta-data.
- Admin Email Address: The admin email address. Enter a valid email in case you forget your password. This is the email address where you'll receive a link to change the admin password.
- Admin Username: Joomla! uses a default "admin" as the username for the Super User. You can leave it as is, change it now(which a good Security measure) or use My Profile in the Administration interface to change it later.
- Admin Password: Remember that super user has maximum control of the site (frontend & backend), so try to use a difficult password. Use My Profile in the Administration interface to change it later. Confirm the password in the Confirm Admin Password box.
- Site Offline: Click the Yes or No box. Yes - this means when installation is complete, your Joomla! website will display the 'Site is offline message' when you browse to yoursitename.com to view the home page. No - this means the site is live when you browse to yoursitename.com to view the home page. You can use the Site Global Configuration in the Administration interface to change the Offline status at any time.
Database Configuration

You will need to enter the information about the database you will use for Joomla! now. It was suggested to write this information down under "Prepare for Install" tab. You may also read or review Creating a Database for Joomla!.
J30 Installation screen page 2.png
For simplification, these intructions are a reference to installing with a MySQLi database. The instructions on the installation page are self explanatory, but here they are again:
J30 Installation screen page 2.png
For simplification, these intructions are a reference to installing with a MySQLi database. The instructions on the installation page are self explanatory, but here they are again:
- Database Type: MySQLi is the common database used
- Hostname: Where is your database located? Common is localhost, but some hosts use a specific database server such as dbserver1.yourhost.com
- Username: The username used to connect to the database
- Password: The password for the database's username
- Database Name: The name of the database
- Table Prefix: One is generated automatically, but you can change it. For example, jos3_ can be used. Just don't forget to put the underscore character(_) at the end of the prefix.
- Old Database Process: Should the installer backup or delete existing tables during the installation of new tables? Click, Yes or No to select the choice.
All these choices can be edited on the Site Global Configuration page, under Server options after the installation is completed. Note, you will break your installation if you change these settings after installation unless you have a complete copy of the current database being used by the Joomla! installation. Common uses would be to update the username and password of the database or to complete a move of an existing installation to a new host with different parameters.
Overview
It is now time to finalise the Joomla! installation. The last page of the web brower installation contains all the information about the installation. This includes the options(at the top) for installing sample data and the installation's configurations(at the bottom).
Install Sample Data and Email Configurations
The first options are for automatically installing sample content to the website and emailing the configuration settings.
J30 Installation screen page 3 top.png
If you are new to Joomla! it would be benefical to install some sample data to see how Joomla! works. You can at this time choose to have the configuration settings emailed to you. If the Email Configuation choice is selected, the Email Password choice will appear. The email password is off by default for security. You can choose to have the password included, just click Yes.
Time to check the configurations of your install and the environment of the installation.
Source: http://cuponhosgator.blogspot.com/


0 comentarios:
Publicar un comentario